[출처] 안드로이드로 구글맵 다루기 - 2. 맵(MapView) 나타내기|작성자 녹차
- 2. 맵(MapView) 나타내기
android.location패키지와 Com.google.android.maps패키지 클래스들의 상세한 설명을 원하는 분도 있겠지만 이 과정이 먼저라고 생각합니다. 짜증나는 맵 API키 얻기 과정을 해야 해당 클래스들을 써먹을 수 있기 때문이죠.
1. 먼저 프로젝트를 생성합니다.
전 BlogMap이라는 프로젝트로 생성해 보겠습니다. 생성시 주의할 점은 Build Target을 정할 때
반드시 Google APIs를 선택해야 합니다.
차이점은 Android (버전이름) 은 내부 API만 사용할 수 있고
Google APIs는 내부 API + 구글이 제공하는 API까지 사용이 가능하다는 점입니다.

2. XML에 MapView를 등록해줍니다.
- main.xml -
<LinearLayout xmlns:android="http://schemas.android.com/apk/res/android"
android:orientation="vertical"
android:layout_width="fill_parent"
android:layout_height="fill_parent"
>
<TextView
android:layout_width="fill_parent"
android:layout_height="wrap_content"
android:text="맵 테스트입니다."
/>
<LinearLayout
android:orientation="vertical"
android:layout_width="fill_parent"
android:layout_height="wrap_content"
android:layout_weight="1"
>
<com.google.android.maps.MapView
android:id="@+id/map_view"
android:layout_width="fill_parent"
android:layout_height="fill_parent"
android:enabled="true"
android:clickable="true"
/>
</LinearLayout>
</LinearLayout>
3. 이제 자바 파일을 수정합니다.
자바 파일에는 MapActivity를 상속받아야 하고 MapActivity를 상속받으면 반드시
isRouteDisplayed()란 파일을 오버라이드해야 합니다.
- BlogMap.java -
import com.google.android.maps.MapActivity;
import android.app.Activity;
import android.os.Bundle;
public class BlogMap extends MapActivity {
/** Called when the activity is first created. */
@Override
public void onCreate(Bundle savedInstanceState) {
super.onCreate(savedInstanceState);
setContentView(R.layout.main);
}
@Override
protected boolean isRouteDisplayed() {
// TODO Auto-generated method stub
return false;
}
}
4. 그리고 AndroidManifest.xml을 수정해 줍니다.
먼저 외부 라이브러리를 사용하기 때문에 어플리케이션이 사용한다는 메시지를 보내줘야 합니다.
다음으로 구글맵은 기기에 깔려있는 것이 아니라 인터넷을 통해서 맵 타일을 가져오는 것입니다. 때문에 기기가 인터넷이나 3G망 같은 통신망을 통해서 정보를 받아와야 합니다. 그렇기 때문에 Manifest에 해당 어플리케이션이 인터넷을 사용한다는 표시를 해줘야 합니다. 아래의 코드를 추가시킵니다.
<uses-library android:name="com.google.android.maps"/>
<uses-permission android:name="android.permission.INTERNET" />
- BlogMap Manifest -
<?xml version="1.0" encoding="utf-8"?>
<manifest xmlns:android="http://schemas.android.com/apk/res/android"
package="exam.BlogMap"
android:versionCode="1"
android:versionName="1.0">
<application android:icon="@drawable/icon" android:label="@string/app_name">
<activity android:name=".BlogMap"
android:label="@string/app_name">
<intent-filter>
<action android:name="android.intent.action.MAIN" />
<category android:name="android.intent.category.LAUNCHER" />
</intent-filter>
</activity>
<uses-library android:name="com.google.android.maps"/>
</application>
<uses-sdk android:minSdkVersion="7" />
<uses-permission android:name="android.permission.INTERNET" />
</manifest>
5. 이제 이 코드를 수행하면 아무것도 화면에 안나오는 것을 볼 수 있습니다.
심지어 에러까지...
네. 여러분을 가지고 장난을 친게 아닙니다. (;)
구글맵은 구글에서 서비스를 하는 것이기 때문에
구글의 허락을 받아야 합니다. 그럼 어떻게 허락을 받느냐!
게임을 설치할때 CD-KEY를 입력해 보셨을 겁니다. 그런것과 같이 맵에서 API Key가 필요합니다.
API Key를 얻는 것은 다른 포스트에서 설명하겠습니다. 워낙 긴 과정이 될 수가 있어서 다른 포스트에 작성해야 할 것 같네요.
맵에 나타내는 것은 API를 얻고 나서 하도록 하겠습니다.
맵 API키 얻기 포스트 링크
http://blog.naver.com/crowdark7/111658386
6. API키 속성 추가
이제 API키를 얻었으니 XML파일에 API키를 추가 시켜줍니다.
- XML -
<?xml version="1.0" encoding="utf-8"?>
<LinearLayout xmlns:android="http://schemas.android.com/apk/res/android"
android:orientation="vertical"
android:layout_width="fill_parent"
android:layout_height="fill_parent"
>
<TextView
android:layout_width="fill_parent"
android:layout_height="wrap_content"
android:text="맵 테스트입니다."
/>
<LinearLayout
android:orientation="vertical"
android:layout_width="fill_parent"
android:layout_height="wrap_content"
android:layout_weight="1"
>
<com.google.android.maps.MapView
android:id="@+id/map_view"
android:layout_width="fill_parent"
android:layout_height="fill_parent"
android:enabled="true"
android:clickable="true"
android:apiKey="02x_c5JI-mT4GW94n3YBVANhTv2n4ZMQbn-GGxQ"
/>
</LinearLayout>
</LinearLayout>
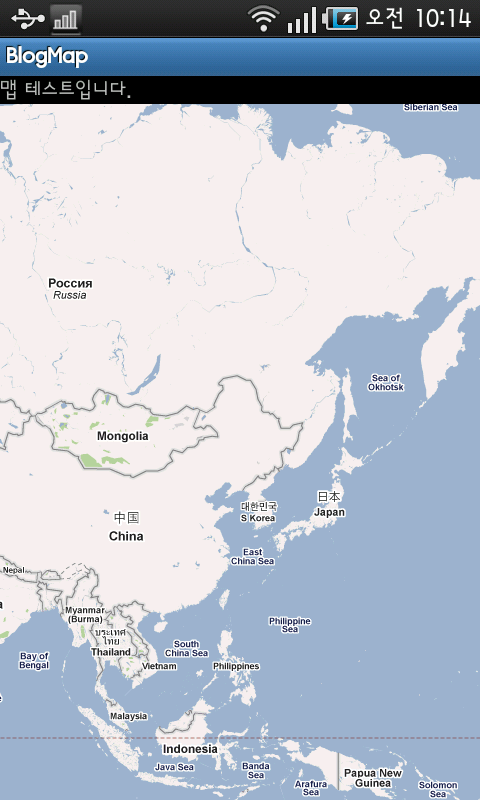
7. 실행!
이제 실장비나 에뮬레이터에 실행시키면 맵이 표시됩니다.
'개발 > 안드로이드' 카테고리의 다른 글
| Android app에서 Twitter 연동하기 1 (0) | 2011.08.22 |
|---|---|
| 안드로이드로 구글맵 다루기 - 2. 구글맵 API키 얻기 (0) | 2011.08.19 |
| 안드로이드로 구글맵 다루기 - 1. 전체 구조 이해 (0) | 2011.08.19 |
| [안드로이드]Android Sensor - Orientation (0) | 2011.07.19 |
| [안드로이드]방향(Orientation)센서 사용예제 (0) | 2011.07.18 |
댓글